Support Pages
Adding an Email Account to Outlook Express

Start Outlook express. Either from the desktop icon or from the Start Menu.

If it is the first time that you have used it it will open the Connection Wizard for you. If you are adding an Email address to an existing email service, then you will need to start the mail wizard yourself.
To open the address wizard go to the Tools menu and select the Accounts option.
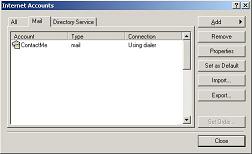
When the Accounts box opens select the Mail Tab and then select the Add button followed by the Mail... Option. This will start the mail account wizard.
If you already have an Email account, it will be visible in the accounts window.
Adding a new account will not effect any existing mail accounts.
If you make a mistake in any of these steps you can always use the Remove button to delete the unwanted Email account and then Add the Email account again.
The Wizard will display several boxes in sequence. Each one will require you to add information that Outlook Express requires in order to send and receive the Emails for you.
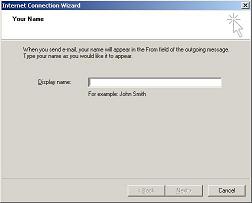
The first box asks you to enter a Display name. This is the name that will identify you when someone receives the Emails you send.
Enter either:
- your First Name,
- First & Last Name
- your full Email Address.
- or a Nickname everyone knows you by.
Using a common nickname like "Bob" can be confusing to anyone who does not know you or knows several Bobs.
Click the Next button when you are ready to continue.
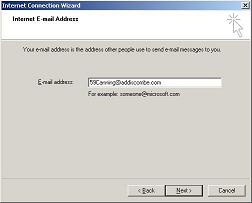
The next box will ask for the Email Address. Enter the Address that you have been given. This will usually be your name followed by the domain like this example - firstname.lastname@addiscombe.net
Click the Next button when you are ready to continue.
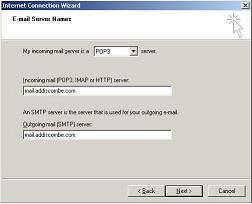
The Server Names box is the next to be displayed. This box is used to enter the Email server that will be used to send and receive Emails.
Leave the top drop down box set to POP3.
In the Incoming mail POP3 server box enter the line mail.addiscombe.net.
In the Outgoing mail SMTP server box you need enter one of the following. If you are using the Fasthosts dialler then enter smtp.addiscombe.net or if this does not work for some reason try smtp.fasthosts.co.uk
If you are using another dialler or broadband then enter mail.addiscombe.net. However this will not work on all of the ISP connections such as AOL & Demon. When using these services you may need to make additional adjustments. In many cases, connections can be made easily by just changing the SMTP to the same one used by your ISP. The following list suggest some of the alternate ones that can be used if you are using their Internet services.
BT Broadband Users should use mail.addiscombe.com. However if this does not work for you. You may need to use one of those listed on the right. A Username and password may be required for these services.
i.e. You may need to sign up with BT first.
- BT Internet Diallers - smtp.btinternet.com, smtp.btbroadband.com or smtp.btopenworld.com
- Wanadoo Broadband and Dialler - smtp.wanadoo.co.uk
- OneTel Broadband - smtp.oneteldsl.com
- Pipex - smtp.dial.pipex.com
- AOL - None Known
- Demon - post.demon.co.uk
- NTLWorld - smtp.ntlworld.com
If none of the above apply trying using smtp.fasthosts.co.uk with a the fasthosts dialer provided
Click Next when you are ready to continue.
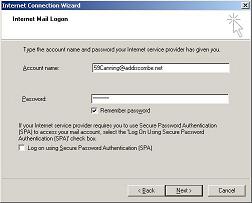
The Internet Mail box is the next to be displayed. This is where you need to enter your Email Address again and the Password that you have been given.
e.g. firstname.lastname@addiscombe.net
Tick the Remember Password box so that you do not have to enter the password each time you use the service.
Click Next when you are ready to continue.

Congratulations you have now completed all the steps required to set-up your Email Account.
Click Finish when you are ready to continue.
There are just a couple of steps left to finish off this process. You will have returned to the Mail account box where you started the account wizard.
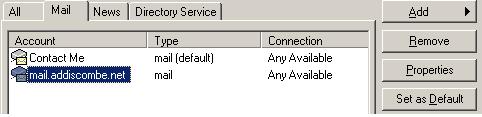
If you have more than one account setup, you should set the mail Email account now. by selecting it and clicking the Set as Default button. This will ensure that all of your Emails are sent via that account.
Select the mail.addiscombe.net account and click the Properties button. This will display the properties box for this account. You can use the properties box to edit the account details.
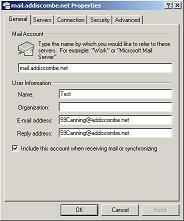
The General tab is displayed first. This will show you the details that you have entered.
Name is the From name that person you Email will see in their Inbox.
Enter an Organisation name if wish or leave it blank.
Enter the reply Email Address. Usually this will be the same as the Email Address provided. You can leave this blank, however many Anti-Spam programs will delete Emails that have no reply address.
Click Apply when you are ready to continue.
That completes the setting up process. None of the other settings need to be changed.
You can check or edit the Servers tab details whenever required. However you should only change them if they are incorrect.

Click the OK button to close the properties box and then click the Close button on the mail account box.
You are now ready to send and receive Emails.
Problem Solving
Some Internet Providers make it difficult to send Emails through their dial-ups and broadband unless you use their own logon account details.
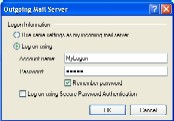
In the last image above there is a tick box near the bottom of the form. Tick the box to enter your providers logon details. The button beside it will become visible to enable you to open the special login Settings box.
The Account name and password are provided by your connection provider.
See Also: